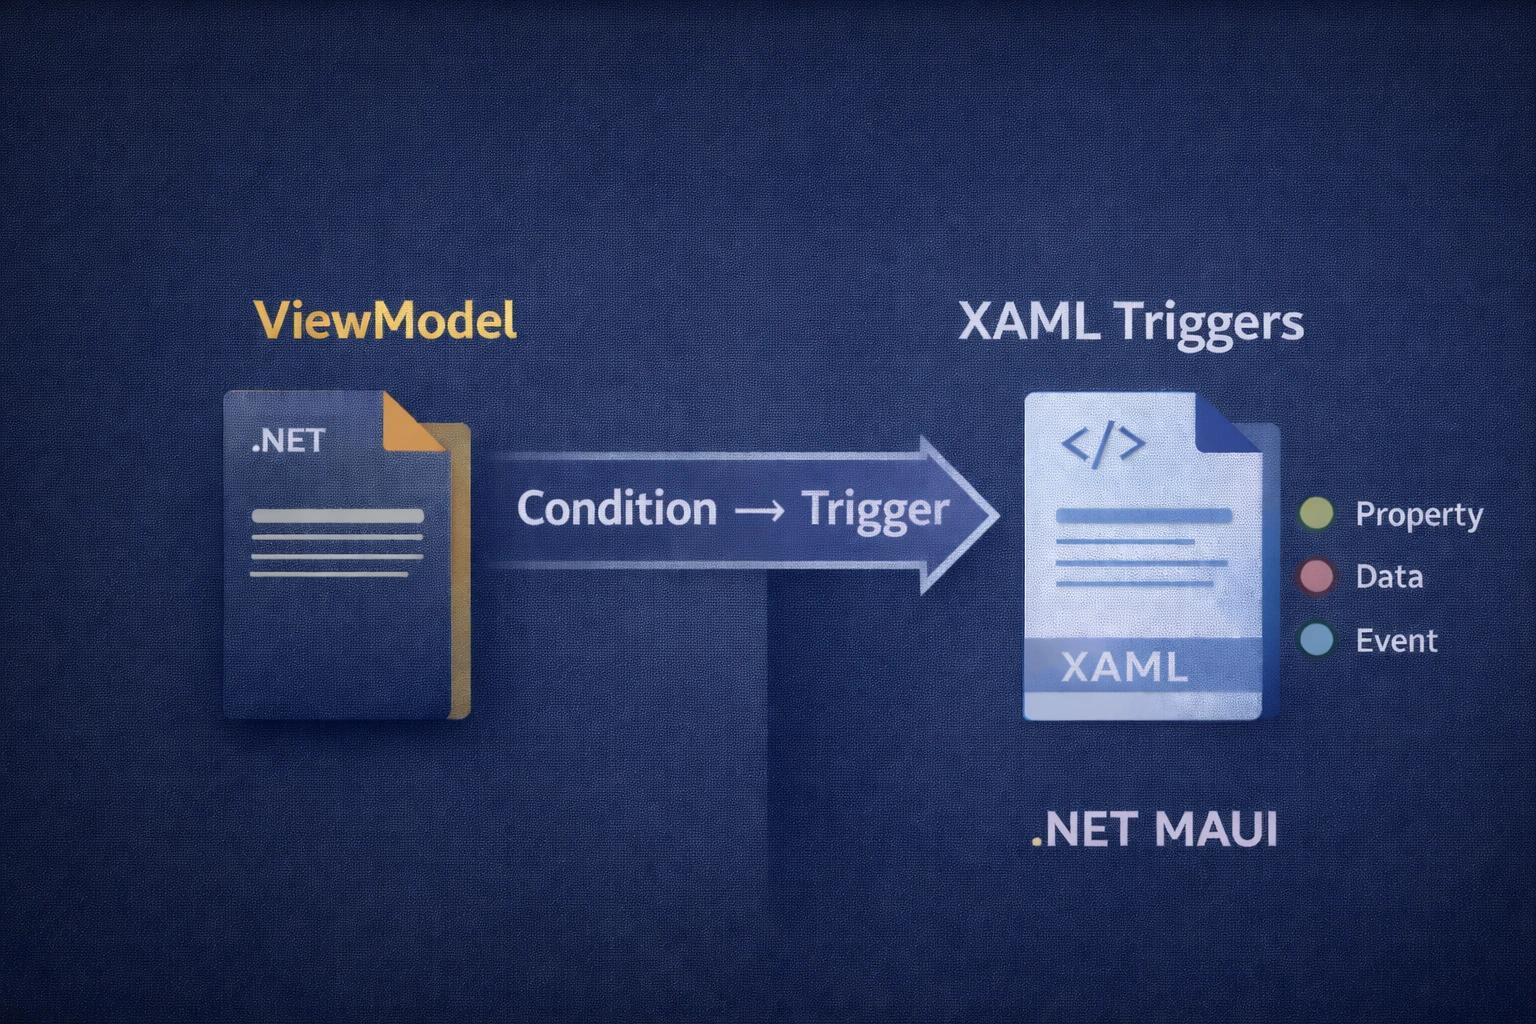
Every .NET MAUI app has conditional UI logic. A button that grays out when a form is incomplete, a label that turns red when validation fails, A card that highlights when selected, etc.
Normally with MVVM you would solve this like this:
public partial class FormViewModel : ObservableObject
{
    public bool CanSubmit { get; set; }
    public Color SubmitButtonBackground { get; set; } = Colors.LightGray;
    public Color SubmitButtonTextColor { get; set; } = Colors.DarkGray;

    private string Email
    {
        get => _email;
        set
        {
            var isValid = !string.IsNullOrEmpty(value);
            CanSubmit = isValid;
            SubmitButtonBackground = isValid ? Colors.Green : Colors.LightGray;
            SubmitButtonTextColor = isValid ? Colors.White : Colors.DarkGray;
        }
    }

    private string _email = string.Empty;
}<Entry Text="{Binding Email}" Placeholder="Enter email" />
<Button Text="Submit"
IsEnabled="{Binding CanSubmit}"
BackgroundColor="{Binding SubmitButtonBackground}"
TextColor="{Binding SubmitButtonTextColor}" />It works, but now your ViewModel is managing visual state and it's aware of UI-related constraints, not something the ViewModel should be concerned about according to the MVVM architecture.
To solve this we have Triggers that help us keep the UI and transition logic within the XAML code. They work by declaratively defining the condition and how the UI should react to it. The framework takes care of the rest.
<Button Text="Submit" IsEnabled="{Binding CanSubmit}">
    <Button.Triggers>
        <Trigger TargetType="Button" Property="IsEnabled" Value="False">
            <Setter Property="BackgroundColor" Value="LightGray" />
            <Setter Property="TextColor" Value="DarkGray" />
        </Trigger>
    </Button.Triggers>
</Button>
Same outcome with cleaner separation and respect for SOLID principles and MVVM architecture. The ViewModel only exposes CanSubmit without worrying about UI rendering.
Anatomy of a Trigger
Every trigger has the same basic structure: a condition and a response.
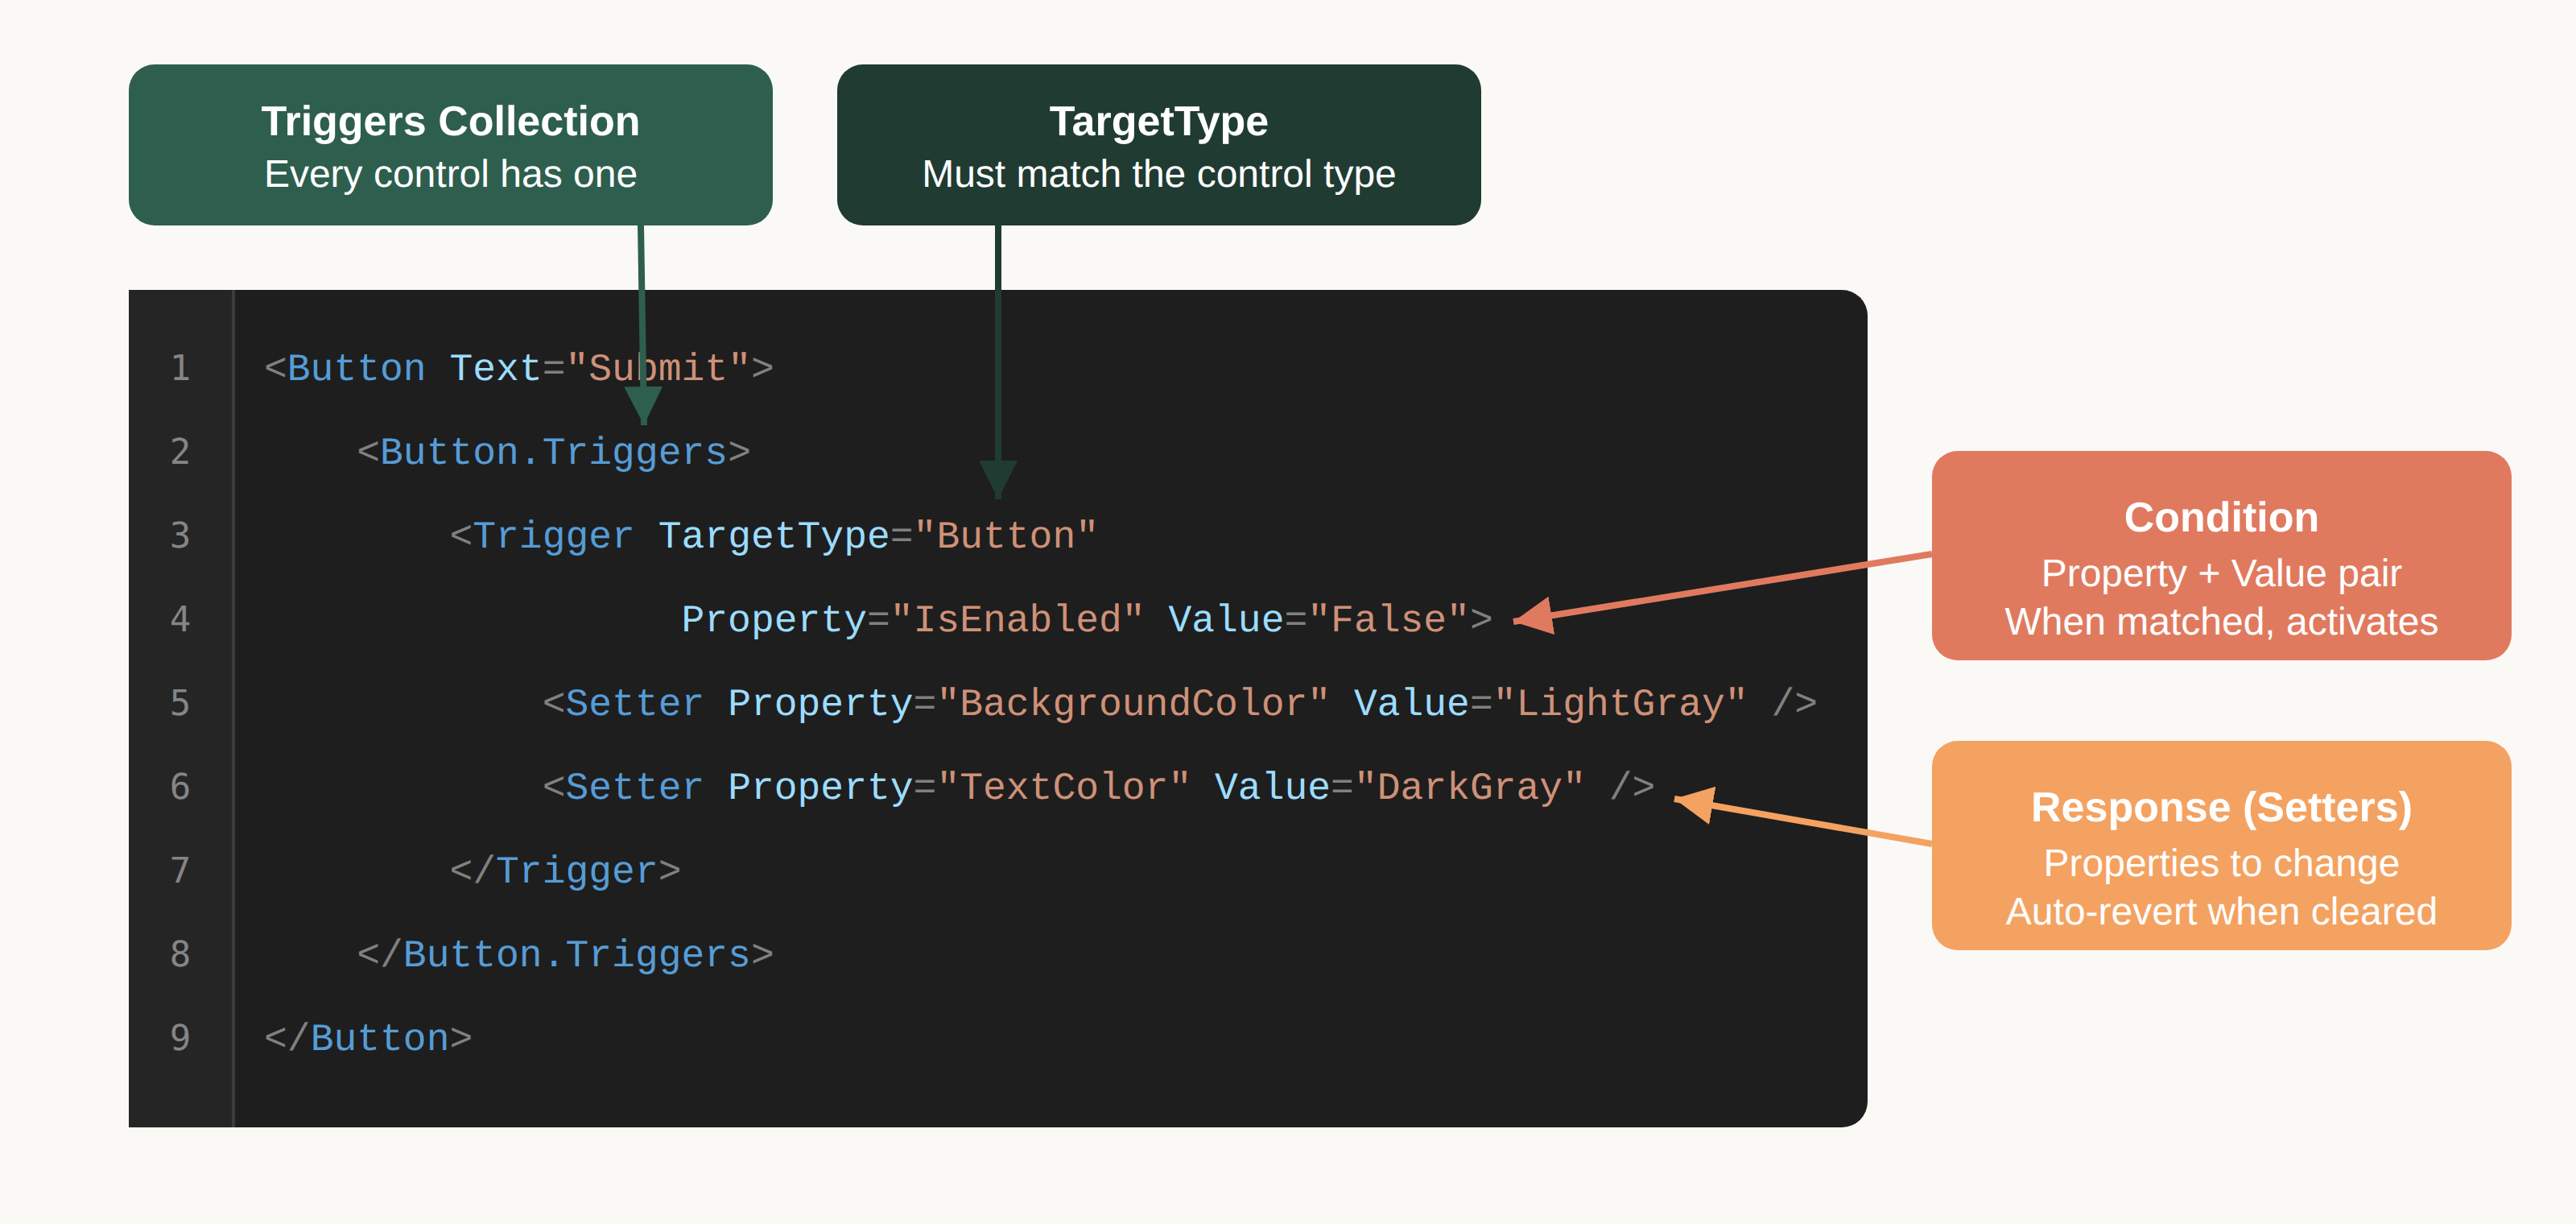
Triggers collection. Every visual element has a Triggers property that holds one or more trigger definitions. You access it through property element syntax: <Button.Triggers>.
Target Type. This attribute specifies what kind of control the trigger applies to, which must match the control you're attaching it to, or be a parent type.
The condition. In a basic trigger, this is the combination of Property and Value. The trigger activates when the specified property equals the specified value. In the example, the trigger fires when IsEnabled equals False.
The Response. These define how the control reacts when the condition is met and you can have as many definitions as you need. You must define one <Setters /> section per response.
Note: When the condition is no longer met, all the setters revert automatically, without the need to define the clear logic manually.
Three Types of Triggers
.NET MAUI provides three trigger types based on the source of the condition.
Property Triggers
Property Triggers react to changes in a property on the same control where the trigger is defined. The example above is a Property Trigger, it reacts to changes from the property IsEnabled that belongs to the control itself.
<Trigger TargetType="ControlType" Property="PropertyName" Value="TriggerValue">
    <Setter Property="PropertyToChange" Value="NewValue" />
</Trigger>
Property Triggers are limited to exact value matches. You can't express "when Text.Length is greater than 0" or "when IsEnabled is not True." For those scenarios, you need Data Triggers with a converter, or you handle the logic elsewhere.
Data Triggers
Data Triggers watch a binding expression instead of a local property.
The key difference is the Binding attribute instead of Property. You provide a binding expression, and the trigger activates when that binding's value matches the Value attribute. This means Data Triggers support anything the binding syntax supports: ViewModel properties, x:Reference to other controls, RelativeSource, property paths, and even converters.
Here are two common scenarios:
Watching a ViewModel property. When Status changes in your ViewModel, the label's appearance updates automatically.
<Label Text="{Binding StatusMessage}">
    <Label.Triggers>
        <DataTrigger TargetType="Label" Binding="{Binding Status}" Value="Error">
            <Setter Property="TextColor" Value="Red" />
            <Setter Property="FontAttributes" Value="Bold" />
        </DataTrigger>
        <DataTrigger TargetType="Label" Binding="{Binding Status}" Value="Success">
            <Setter Property="TextColor" Value="Green" />
        </DataTrigger>
    </Label.Triggers>
</Label>
Watching another control. The button disables itself when the entry is empty
<Entry x:Name="EmailEntry" Text="" Placeholder="Enter email" />

<Button Text="Subscribe">
    <Button.Triggers>
        <DataTrigger TargetType="Button"
                     Binding="{Binding Source={x:Reference EmailEntry}, Path=Text.Length}"
                     Value="0">
            <Setter Property="IsEnabled" Value="False" />
            <Setter Property="BackgroundColor" Value="LightGray" />
        </DataTrigger>
    </Button.Triggers>
</Button>
Event Triggers
Event Triggers go a step further: they react to any event the control supports, where other types can only listen to property changes.
Look at how the structure changes:
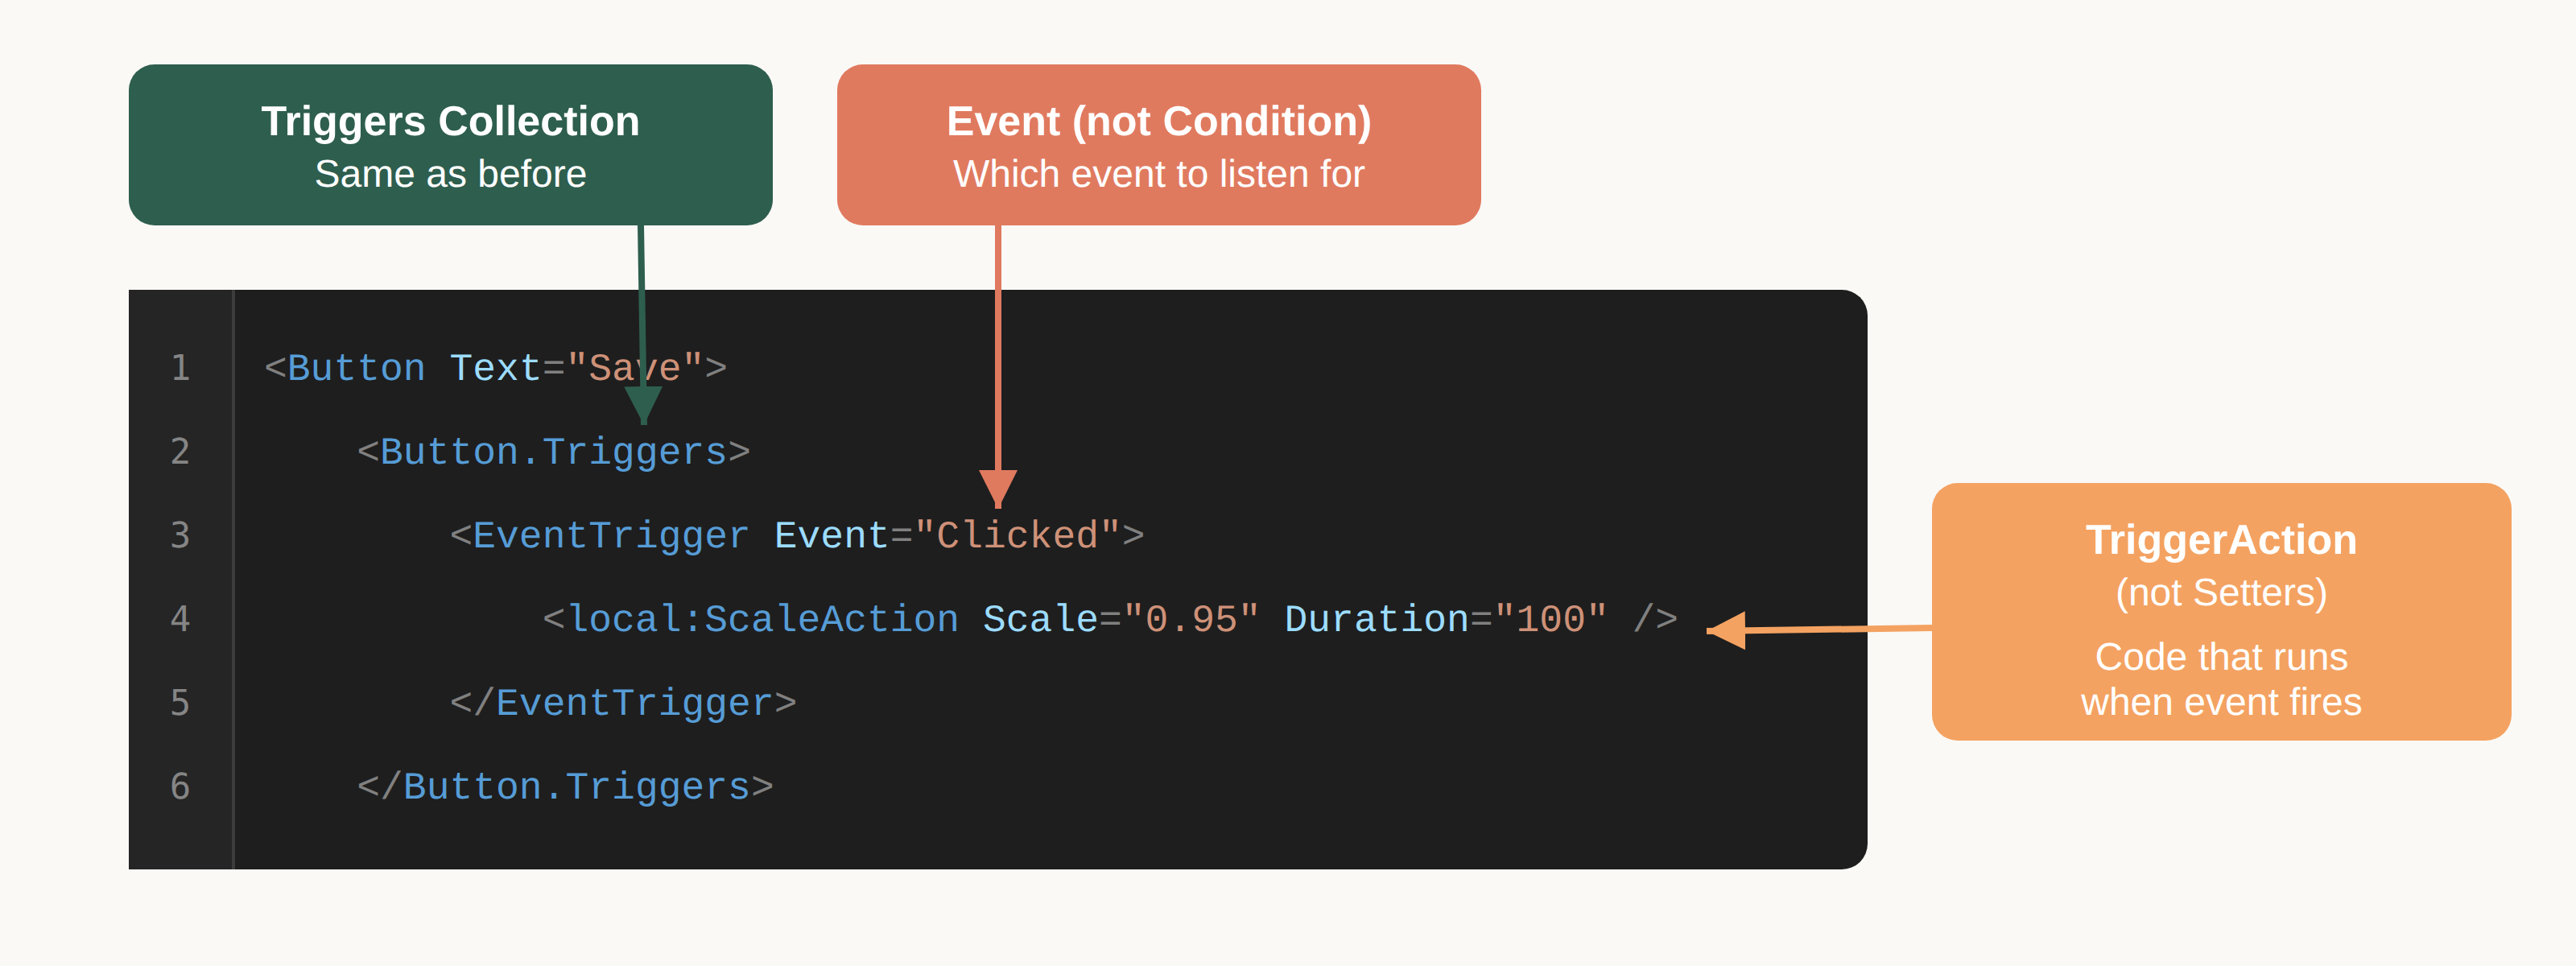
- Triggers Collection - Stays the same as with others
- Condition - A simple
Event=[EventName]in the trigger definition tab, where the event name is a valid event for that control - Reaction - Run custom code by providing an object that inherits from
TriggerAction<T>
Here's a code sample:
<Button Text="Save">
    <Button.Triggers>
        <EventTrigger Event="Clicked">
            <local:ScaleAction Scale="0.95" Duration="100" />
        </EventTrigger>
    </Button.Triggers>
</Button>public class ScaleAction : TriggerAction<VisualElement>
{
public double Scale { get; set; } = 0.95;
public uint Duration { get; set; } = 100;
protected override async void Invoke(VisualElement sender)
{
await sender.ScaleTo(Scale, Duration / 2);
await sender.ScaleTo(1, Duration / 2);
}
}One key difference from other triggers: there's no automatic reversion as you would have with Property and Data Triggers. Event Triggers don't track state at all and it's up to you to handle the clear logic if needed.
Event Triggers are ideal for animations, haptic feedback, sounds, or any behavior you want to trigger declaratively without managing it in code-behind.
What Triggers Cost You
Triggers aren't universally better than code-behind. They're a tradeoff.
You gain declarative UI rules that live with the visual definition and can react to property changes, binding data updates, and even control events.
You lose some debuggability since XAML code doesn't hit breakpoints. Also, complex conditions can make your XAML components more verbose.
Performance is generally fine as triggers use the same property system as normal XAML.
The real risk is overuse. For complex or interdependent conditions, C# code might be a clearer choice.
Making Them Reusable
Triggers can be defined as part of a style that is shared across multiple controls:
<Style x:Key="StatusLabel" TargetType="Label">
    <Style.Triggers>
        <DataTrigger Binding="{Binding Status}" Value="Error">
            <Setter Property="TextColor" Value="Red" />
            <Setter Property="FontAttributes" Value="Bold" />
        </DataTrigger>
        <DataTrigger Binding="{Binding Status}" Value="Success">
            <Setter Property="TextColor" Value="Green" />
        </DataTrigger>
        <DataTrigger Binding="{Binding Status}" Value="Pending">
            <Setter Property="TextColor" Value="Orange" />
        </DataTrigger>
    </Style.Triggers>
</Style>
Now any label can pick up this behavior:
<Label Text="{Binding Message}" Style="{StaticResource StatusLabel}" />
<Label Text="{Binding SecondaryMessage}" Style="{StaticResource StatusLabel}" />
One definition, consistent behavior, single place to update when requirements change.
Summary
Triggers let you declare conditional UI logic in XAML instead of managing visual state in your ViewModel or code-behind.
- Property Triggers watch the control itself.
- Data Triggers watch bindings.
- Event Triggers execute code when events fire.
The value is separation of concerns: visual rules live with the visual definition, and your ViewModel stays focused on state and behavior.
The cost is reduced debuggability and potential verbosity. For straightforward "when X, do Y" scenarios, triggers are the right tool. For complex conditional logic, it's better to stick with code definitions.